
Flappy Bird Game with Arduino Uno

Flappy Bird Game with Arduino Uno

Hello Guys, I hope you all are doing well. My Name is Vivek Garg and I welcome you all to my Blog Mostly Programing. If you're new here I will suggest you to check out my YouTube channel @mostlyprograming. I post 3 New Videos every week, Let's Code Tuesdays, Innovative Thursdays, and Geeky Saturdays. 
Go! Go! Go! Check it out and if you like the content you can maybe give me a subscription or a comment or a like (YOU DECIDE!).

So, Today we are gonna build a fun game with Arduino. This game is called The Flappy Bird game, I bet you must have played this game in your childhood. And if not you can make one today and play.

Components Required

  1. 1 x BreadBoard
  2. 1 x Arduino Uno Board
  3. 1 x I2C LCD Display (16x2)
  4. 1 x 10 KOhm Resistor
  5. 1 x Push Button
  6. Jumper Wires
  7. USB A/B Cable

Circuit Diagram

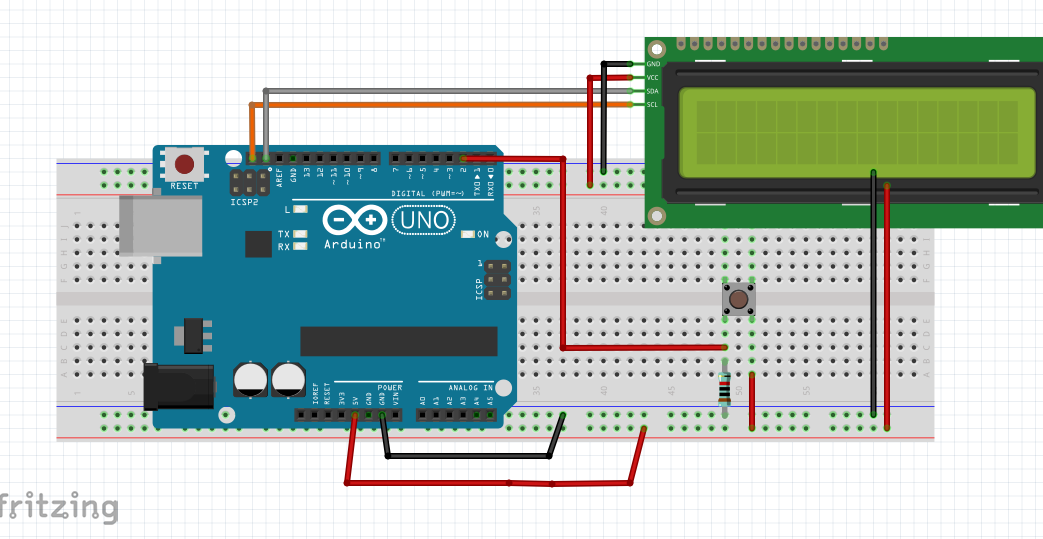
Fig. 1 Circuit Diagram

Connections:

SCL(LCD) ---> A5/SCL Pin
SDA(LCD) ---> A4/ SDA Pin
Vcc (LCD) ---> +5Volts
Gnd (LCD) ---> Gnd 

Place the push button on the breadboard as shown in Fig. 1
Ground 1a terminal of pushbutton through a 10 K ohm Resistor also, connect the same 1a terminal to the D2 pin of Arduino.
Connect 2a terminal of the Push Button to +5Volts.
(Note: A Push Button Functions only when it is pulled up).

That's all the connections required for the Flappy Bird game using Arduino.
Let's see the Arduino Code Now.

Code

You can also download the .ino file from the link below:
Also, the necessary libraries are included in the same folder:
The Flappy Bird.ino

YouTube Video

You can also watch the complete video tutorial here on YouTube.


Also, If you have any queries, feel free to comment down below and I will try my best to solve, or you can directly DM me at my social media accounts.

Twitter    

Content Creator: Vivek Garg


Comments

Post a Comment

Popular posts from this blog

JoyStick HW-504 Interfacing with Arduino

JoyStick HW-504 Interfacing with Arduino Hello Guys, I hope you all are doing well. My Name is Vivek Garg and I welcome you all to my Blog Mostly Programing. If you're new here I will suggest you to check out my YouTube channel  @mostlyprograming . I post 3 New Videos every week, Let's Code Tuesdays, Innovative Thursdays, and Geeky Saturdays.  Go! Go! Go! Check it out and if you like the content you can maybe give me a subscription or a comment or a like (YOU DECIDE!). So, In Today's Tutorial, We are going to see How a PS2 Thumb Joy Stick Works? and How we can use one with an Arduino. Fig. 1 HW - 504 Thumb JoyStick Module When we hear the word joystick, the first thing that strikes our mind is Game Controllers (Like the one shown in Fig. 2). Mainly we use them for playing Games but we can do a lot of fun stuff with them in Electronics. For instance Controlling Robo Cars, Controlling Barrier Gates, etc. Fig. 2 Game Controller Hardware Overview Th...

Introduction to Python

Lesson 1 - Introduction to Python Hello Guys, I hope you all are doing well. My Name is Vivek Garg and I welcome you all to my Blog Mostly Programing. If you're new here I will suggest you check out my YouTube channel  @mostlyprograming . I post 3 New Videos every week, Let's Code Tuesdays, Innovative Thursdays, and Geeky Saturdays.  Go! Go! Go! Check it out and if you like the content you can maybe give me a subscription or a comment or a like (YOU DECIDE!). Here in Lesson 1 of Learning Python from scratch we will be discussing some basics about Python, Its Applications, Also we will see why do we use Python and How is it different from any other Programming Languages? Also, we will Install Python in our System. What is Python? Python is a general-purpose Programming language as it supports all the programming paradigms, it is a popular scripting language, as it is used for writing scripts for automation purposes. It was created by Guido van Rossum...